PVP Karting, Fabriksvangen 5 C, 3550 Slangerup, Denmark, Web: www.pvpkart.com, Tel: *45-4738 2001, Mobil: *45-4026 9021
Setup information on PVP Superkart for Div. 1 and Div. 2
Last update 28-03-2017 Print in PDF
Steering geometry: Camber: 0 DG, Castor: 18,5 DG, Tow in: 0-1,0 mm, if you want is to turn more in the tight corner, then increase the caster.
Front tires: Dunlop and Hoosier, on a chassis from 2008 and older then put all the washer under the upright (8 pieces), on a chassis from 2009 and up to 2012 then have 6 washer under the upright, and the aluminum house for the rear axel bearing in the middle position, on a chassis from 2012 and up to date then have 4 washer under the upright, and the aluminum house for the rear axel bearing in the middle position, it is very important that the front of the kart is lower than the rear end of the kart, if the kart is to high in the front, you will get air under the kart and you will lose the grip.
There is 2 options of setup on the PVP kart in dry conditions.
Number 1: With 120 mm. wide front wheels: treed width measure to the center of the wheels: Front wheel: 944 mm. ( 40mm. spacer ) Model 2017: 984 mm. Rear wheel: 1028 mm. ( 12,6 mm spacer ). Mount the nose in hole no. 2 from the lowest position , then you have the front bumper there you can adjust the nose cone then make a 12mm . gab between nut and the bushing in dry condition, and the wing with tap in the middle position, if you have a wing without the tap then make it in the highest position.
Tire pressure on Dunlop DES or DFS: 0,8-0,9 atmosphere (10-12 psi.) on the front tire, 0,8-1,0 atmosphere (11-14 psi.) on the rear tire.
Number 2: With 150 mm. wide front wheels: treed width measure to the center of the wheels: Front wheel: 942 mm. Model 2017: 982 mm. ( 25 mm. spacer inside and places the 40 mm. spacer outside ). Rear wheel: 1028 mm. ( 12,6 mm spacer ). : Mount the nose in hole no. 2 from the lowest position , then you have the front bumper there you can adjust the nose cone then make a 12mm . gab between nut and the bushing in dry condition, the wing with tap in the middle position. if you have a wing without the tap then make it in the highest position.
Tire pressure on Dunlop DES or DFS 0,8-0,9 atmosphere (10-12 psi.) on the front tire, 0,8-1,0 atmosphere (11-14 psi.) on the rear tire.
On 2009 type of front bumper, can you adjust the nose cone so you have the correct balance be twin front and rear wing down forces, and always have the nose cone in second hole from the bottom if there is more than one hole.
Setup on the PVP kart in wet conditions:
With 150 mm. wide front wheels: treed width measure to the center of the wheels: Front wheel: 974 mm. ( 40 mm. spacer ) Model 2017: 1014 mm. Rear wheel: 1028 mm. ( 12,6 mm spacer ). Mount the nose in hole no. 1 from the bottom, on new type of front bumper there you can adjust the nose cone then second hole from the bottom and adjust the nose cone so there is 5 mm. between the nut and the bushing, and wing with 8 mm. tap in the middle position. with the clip under wing bracket, so the wing is lifted 10 mm. in the rear end, a wing with without tap in the top position. with the clip under wing bracket, so the wing is lifted 10 mm. in the rear end.
Weight balance between front and rear: With 10 liter in the fuel tank, 35-37 % on the front wheel and 63-65% on the rear wheel.
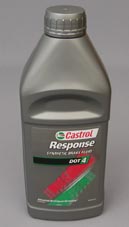
Brake fluid: Castrol Response Super Dot 4 or Castrol React Performance Dot 4. Important: Use only this type of brake fluid, because otherwise it can damage the sealing in the brake system, and the sealing will be to big or to small.
Brakes: The brakes are self adjusting. Size of disk: Front 164x5 mm. Rear: 164x5 mm. Division between front and rear brakes on the adjusting handle: 20mm. from center to center of the bolts, for the front brakes, 25mm. from center to center of the bolts, for the rear brakes. The bolts which hold the brake disc must not be to tight. The right way to do this, is to tighten them, and then slacken the nut 1/10 of a turn, on the brakes model 2004 and 2012, is there a 6 mm. bolt there hold brake pads, so it not come out of the caliper also tight this and then slacken it 1/10 of a turn, to make sure it is not bend the caliper in the middle.
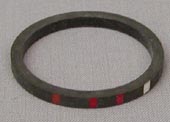
Maintenance of brakes: If the brake pads are not releasing 100% from the disk, then separate the caliper and check the cleanse between the piston and the housing, clearance should be from 0,08 to 0,12 mm. next change the caliper seal part no. 1871 is for kart from 1998 and before, and for the new type 2004 Sealing no. 1871 are size D34x2,94x3,2 and have marking: Brown, red, red, white, use part no. 1872 for caliper on kart from 1999 to 2003.. Sealing no. 1872 are size D34x3,07x3x3 and have no marking.
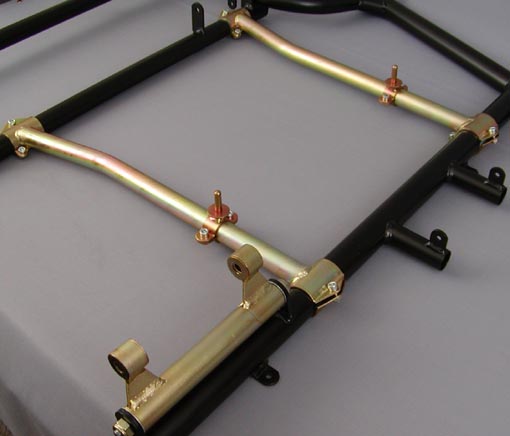
Seat: You can fit the seat in tow different positions across the kart, by changing the two front seat mounts left to right and vice versa and turn the rear mount 180 DG. On the rear seat mount model 2000 is it possible to move the seat steeples from side to side 22 mm.. On model 2006 is it possible to move the seat steeples from side to side, both front and rear
Rack and pinion steering: It is possible to adjust the backlash of the rack and pinion by turning the two aluminum rings that hold the bearings, making sure the marks remain in line.
To save money and avoid damage the motor, is hear some information regarding petrol pressure with different size of needle valve seats on DELORTO or PVP carburetor: Needle valve seat no. 200, use pressure from 0,25 to 0,3 atmosphere (3,5-4,2 psi), Needle valve seat no. 250 from 0,15 to 0,2 atmosphere (2,1-2,8 psi), Needle valve seat no. 300 from 0,1 to 0,15 atmosphere (1,4-2,1 psi). I recommend size no. 250 for kart